Prepare Photographs FOR ANALYSIS
by Joelle Steele
 A picture is worth a thousand words. How true! But sometimes an antique photograph can raise a lot of questions about its origins — who is in it or when was it taken, or where, or if it is the same person as shown in another photograph. To answer these questions and more, a good eye for detail is an absolute necessity. Photos have to be meticulously scrutinized, analyzed, and in all ways examined in relation to their photographic processes and their content.
When comparing faces in photographs, images must first be properly prepared in order to rule out faces that resemble each other but that are not a match. This is especially true when comparing faces in biometric databases, and it's a multi-step process that requires a scanner and photo editing software such as Photoshop.
STEP ONE
Remain Neutral. No matter how closely a snapshot looks like your mother when she was 15 years old, no matter how badly you want that old tintype to be of your great-great-uncle Henry in his Civil War uniform, no matter how many people have told you a photo is your famous great-grandfather, no matter what your preconceived notions are about any image, you have to set all of that aside and be as neutral and objective as possible. You have to use your eyes and your knowledge to get to the truth.
STEP TWO
Read the Writing. Dates are often printed or stamped on the back (sometimes the front) of a photo as part of the photo printing process. That date does not necessarily mean the photo was taken on or even near that date, as the film could have been in the camera for months and may contain images taken at different times. A handwritten date may be on the back too, and it may or may not be accurate depending on who wrote it. But dates like these can still be valuable clues. If the writing is too faded to read clearly, try scanning it and then using a photo editing program like Photoshop or IrfanView to enhance the writing enough to read it and see if it has any information that can be used to date the image.
Sometimes there are just numbers or symbols on the back, and these can also be clues as they can often be traced back to the photo processing company. Deckled prints (they have jagged or curly edges) can sometimes be put together with other photos like a jigsaw puzzle to see if they were all printed from the same roll of film. If one of them is dated, the others are likely to have been made around the same time (possibly within a year or so of each other). This can usually tell you what kind of camera and film were used, as that dictates the size of the prints, particularly with modern-day snapshots.
STEP THREE
Look for the Photographer's Name. With encased photos, the photographer's logo or name may be underneath the image, which means removing it from the case. This should only be done by a professional as it is very easy to inadvertently and irreparably damage these fragile images. Photos on paper often have a photographer's name or logo and address on the back or on the mat that frames the photo. If the photographer was not sufficiently well-known to be historically recognized on a Web site, you can still visit your library and check into old city directories to narrow down the dates during which he/she was active at that address.
STEP FOUR
Photos must be scanned at 300dpi to 600dpi so that the details of the faces will be visible, clear, and measurable down to the smallest detail. The photos should be enlarged to at least 15cm (6") to 20cm (8") in width. This high resolution is essential for making accurate measurements down to .08cm (1/32"). If entering the images into a database, the image size -- not the resolution -- can be reduced slightly prior to storage to reduce the file size.
STEP FIVE
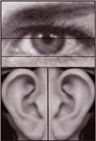
If the ears are visible, they are the very first things to compare. Ears are as unique as fingerprints in their size, shape, patterning, angle, and placement on the head. They do not move with changes in facial expressions. They are often at least slightly different on the same head. Ears can be examined from the side of the head and/or from a head-on face view. If any two lookalike people have even the slightest difference in ears, that difference will immediately rule out a match. Unfortunately, in many photographs, ears are not visible because they are obscured by hair, hats, and hoodies, or they are visible in one photo and not in the other. In those cases, it is necessary to continue to the next step.
STEP SIX
Align the pupils of the eyes in both photos using the pull-down horizontal gridline in your photo editing software. This is a far more practical and accurate means of alignment than the use of the Frankfurt Horizontal Plane.
STEP SEVEN
Use your photo editing software to enlarge/reduce the irises of the eyes in both faces until they are exactly the same diameter. When the irises in both faces are the same size, the faces should now be the same size, and the facial features in both faces should align with each other. Sometimes a person has one iris that is larger than the other, and if that is the case, the same size discrepancy should exist in the other face.
SUMMARY
In general, there are many obstacles to comparing faces. Two different and unrelated people can look deceptively similar. Inadequate lenses and awkward camera angles can contribute to mis-identification. Standardized higher resolution images could greatly reduce problems of clarity, particularly in surveillance footage. Better care in taking mugshots head-on, as well as including clear profiles that require the subject to remove anything that is obstructing both of the ears before photographing them would prove very beneficial in ruling out false matches. The differences in ears are generally quite obvious, even to the untrained eye. Including photos of the right and left ears on passports, driver's licenses, and other forms of picture ID would likewise improve accuracy in identifying living people in person when comparing them to the faces and ears on their documents.
Accurately preparing images for comparison is the best way to authenticate identities. Anyone creating biometric software should keep this in mind, as should the people who intend to use that software.